Showing posts with label in. Show all posts
Showing posts with label in. Show all posts
Monday, February 10, 2014
Never listen to your mother in law
One of the more involved builds I have done to date is a small love seat based on a Chippendale design. That said, I never intended to build a couch from scratch.


As I have mentioned previously, we sold our house, moved onto our boat where we lived for a number of years, then sold the boat and moved back to land. When we sold the house we put all of our furniture in storage, not knowing where we were headed in the future. When we sold the boat and moved back to land, it was like Christmas as the movers moved in furniture we hadnt seen in seven years, some of which we had forgotten we even owned.
The problem we ended up facing was a matter of scale - literally. Our friends and family were shocked that we went from a house with 3500 square feet of living space to a 40 boat with only 550 square feet of living space and loved every minute of it. That boat taught us very quickly that excess is unnecessary and actually impedes your lifestyle. Anyway, after a few years, small became normal for us so when we begrudgingly gave up the boat and moved back to land, the 800 square foot apartment we moved into seemed like a small concert hall. It felt that way right up until those movers moved in the furniture. Man, did that apartment shrink in a hurry.
Just as a side-bar, the direct expenses of keeping a boat on the water year-round is not that much different than supporting a house. Where you save the money is on the indirect costs, especially if you enforce the "One on - One off" rule. All this rule means is that if you bring something new onto the boat you have to take something old off, boating equipment and tools exempted, of course. This was a very strong rule for me and it saved me a fortune over the years. When my wife and I were out shopping and she saw something she liked she would ask me, "What do you think about this?" I would always answer, "Its lovely. What are you planning to replace with it?" Worked every time.
So anyway, we couldnt find a couch that was the size we wanted and when we investigated a custom built one all we got was a high priced quote and a whole lot of attitude. I cant figure out retailers today, but that is for another blog to discuss. What I ended up doing was telling them all to stuff it and decided to build my own.
I thought this was a great idea until I realized that I didnt have a clue how to built one. I searched the web for months and finally learned that Fine Woodworking, back in the 1980s, had published an article that included plans for a full sized Chippendale couch built in the traditional manner. Not having a copy of the magazine, I turned to eBay again, kept a watch out for one and eventually purchased a copy. I then took the proportions offered in the magazine article and scaled it down to our needs and changed the design of the arms to reflect those of a Duncan Fife couch I had seen years ago. I drew up a set of plans and went from there.
The entire frame is made from hard maple with all the joints being mortise and tenon which were glued and pinned. All of the legs are mahogany. The arms were laid up using multiple pieces of maple and shaped using a plane, rasp and a pull shave. The mahogany front legs sweep up the entire length of the arms and to ensure they wouldnt split, I drilled and drove dowels along their lengths where the grain was at right-angles and I thought would be the weakest points.
Once the frame was completed I stained and varnished the legs and cross members. The rest of the frame received two coats of S1 epoxy sealer. The manufacturer of this stuff claims it seals the wood but allows it to breath, however that works. Having used it consistently on the mahogany planking of our boat I can attest to their claims that it does retard rot. I have no idea why I sealed the frame with this but it seemed like a good idea at the time.
Once the frame was complete I brought it home from the shop I share with a friend to upholster it. This turned out to be the biggest pain of the entire project.
First, all of the openings in the frame had to be closed with webbing.
Next, all of he coil springs had to be sewn in.
Once the springs are sewn in you have to tie them all together and tie them off to the frame, which gives the seat and back its basic shape.
This is the point where things fell apart for me - not the work on the frame that I had completed, but my abilities as an upholster. I think I gave it four good old college tries but I could never get the material to cover the arms smooth enough. I decided to send it out and have a pro do the covering and this is where I made my next mistake - I listened to my mother-in-law. She had dealt with an upholster many, many years before and she knew he was still in business. She called him and set it up for me to take the frame into his shop.
When I arrived I found this ancient man who probably upholstered the seats on the Ark. My first reaction was, "Wow, a real old-time craftsman", but then I looked around and realized I was standing in the middle of the most disorganized shop I had ever seen, I started to question that judgement. There were literally paths throughout the shop defined by walls of old material, broken bits of furniture framing, rolls of foam, furniture, and other bits and pieces of junk I couldnt even recognize. The guy looked so old and feeble that I really felt my neck allowing him to help me bring in the frame from the roof of the car. I tried to explain what I was looking for but I knew he didnt hear a word I said. He just stared out the window as I spoke, his eyes glazed over. When I had finished explaining what I wanted his only reply to me was, "$650.00". Not another word, no expression, just "$650.00". When we got back into the car I turned to my wife and said, "This is going to be trouble".
Needless to say, I am not fully happy with the mans results but for $650.00, I couldnt argue. One quote I had received from another upholster was $1600.00, so the old adage, you get what you pay for, rings true in this case and I only have myself to blame. While the shape is fine and the material relatively smooth, he folded material where I didnt want it folded and added piping where I could never imagine he would put it, or even could put it.
The most aggravating thing, though, is something I never would have thought that he would do in a million years. I spent weeks building this couch frame copying the way these things have been built for hundreds of years. After months of research I spent days installing webbing, sewing in springs and tying them all together in the traditional manner. This guy grew up with this type of work and probably worked on framing of this type his first day on the job. Working on this type of upholstery job should have been second nature to him. As it turns out, what does he do to my painstakingly built traditional frame? He stuffs the whole thing with foam.
G-r-r-r-r-r!
But hey, my wife is happy with it so who am I to argue.
Peace,
Mitchell

Tuesday, February 4, 2014
Woodworking in Amercia After Hours
Woodworking in America 2013 is just around the corner. If you’re planning on attending, I’m sure you’re getting excited about a weekend of non-stop woodworking discussion already. If you’ve attended previous WIAs you know that the talk of - and camaraderie around - woodworking extend well past the actual conference hours of about 8:30 am to 6:00 pm.
 |
| Steve, Niks Dad, Sean, Vic, Kyle & Matt have fun at Keystone |
Each night of the conference (Thursday, Friday & Saturday) there are official (& Semi-Official) Activities. There is the Lost Art Press Thursday night Roubo release party, the official Friday Night WIA Banquet and the Saturday Evening Planemakers Dinner. These are wonderful activities where you can relax and enjoy with our woodworking friends.
Don’t be fooled though. There is so much more going on at WIA at night.
If you’ve heard me talk about WIA or FWWLive or any other woodworking conference on the Modern Woodworkers Association Podcast, you’ve heard me say over and over how the best part of the conferences is the community of fellow woodworkers who you meet and socialize with over the event. Evening is a prime time for this to happen.
 |
| We work wood and eat German food (and were loud). |
The Modern Woodworkers Association has setup and is helping promote meetups every night of the conference. All are free to enter (you pay for your own food & drink) and all will be attended by fellow woodworkers.
Thursday: MWA Meetup at Keystone
Beginning at 7:00 pm, we’ll be hanging out in the upstairs bar room at the Keystone Bar & Grill. It’s a quick walk from the convention center and most of the hotels. Meeting at the Keystone on the opening night of registration has become a tradition for WIA and we hope you’ll join us. Many fellow MWA members, woodworking bloggers and other WIA attendees will be there. If you’re going to to the Roubo Book Release, don’t worry. You can join us at Keystone afterwards. All are welcome.
Friday: Hofbrauhaus
The Hofbrauhaus excursion on Friday night is another WIA tradition. It’s less organized than the meetups at Keystone, in that we don’t reserve a private room. We just jump on the trolley and head to Hofbrauhaus. It’s a fun night of great beer, great food, great company and loud music. If you’re going to the official WIA Banquet, please join us at Hofbrauhaus afterwards. We usually stay late. If you’re looking to meet us at Hofbrauhaus, there’s no telling exactly where we’ll be, though in past years we’ve started the evening at the outside bar area and then moved to one of the many long tables. Just listen for Tom Iovino and you’ll be sure to find us. All are welcome.
Saturday: WoodTalk Meetup at Keystone
The WoodTalk guys have setup their own Meetup at the Keystone on Saturday night. It begins at 6:30. Since it was organized by and features Marc, Matt & Shannon, you should expect that this will be the smoothest running event of the weekend. Still, it’s going to be an absolute blast and all should come. I know we’re going to try to represent the MWA there in force.
Afterwards:
Just about every night some folks will stop by the Behle St Cafe before heading back to their rooms. If it’s late, but you’re still looking to hang out with woodworkers, joint us there. All are welcome.
Venue Information
Keystone Bar & Grill
313 Greenup St
Covington, KY
Hofbrauhaus Newport
200 East 3rd St
Newport, KY 41071
Take the SouthBank Shuttle (trolley) to the stop between Monmouth St & Saratoga St (it doesn’t have stop names)
Behle St Cafe
50 East Rivercenter Blvd
Covington, KY 41011
Across the street from the convention center in the same building as the Embassy Suites
Dont forget about the +Modern Woodworkers Association Podcast. We talk woodworking with Guests from around the world of woodworking every other week. Subscribe to the RSS feed or iTunes today.Wednesday, January 22, 2014
Some Dynamic Components in SketchUp version 7
The dynamic components are really something great. I have updated a lot of the EZ Smart components that I had in the 3D Warehouse. These components can only be modified in specific ways, thus preventing the possible distortion of the item modeled in unwanted ways. for instance, the EZ Rail can only be changed in its length, you cannot change the thickness or width. You can change the length either by using the Scale Tool or by opening the Component Options window and entering the desired length.
I have modified all the extrusion components to act this way. In addition, I have added a choice to either have the component without color, or with my color scheme applied. I have added this feature to almost all of the components and will eventually have them all that way. To add this feature to the more complex models requires considerable boring work, so they will only get that feature later. These components have the color scheme active.
It is these more complex components that I am having the most fun with. For instance, the Circular Saw with EZ Smart Base component has a number of options that can be set. You can enter the depth of cut in the Options Window and apply it and the saw changes to the desired depth of cut, but an additional 1/8" is added to the depth, to clear the bottom of the work piece, just like I do in the real world.
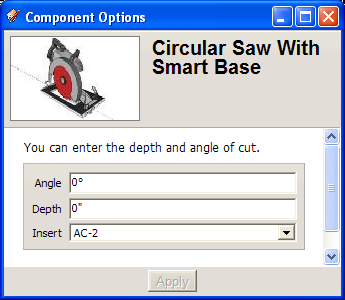
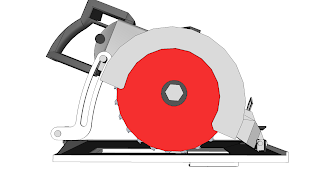
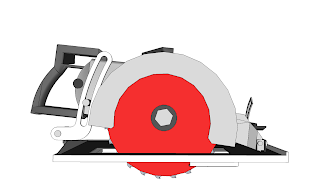
You can select none, AC-1, or AC-2 for the anti-chip insert, but if you change the angle of cut from 0 degrees with the AC-2 selected, the component automatically switches to the AC-1 until the angle of cut is returned to 0 degrees. The angle of cut can be from 0 to 45 degrees.
In the tool line, I have also uploaded a router that you canselect the depth of cut and select which bit to use. Currently there are only a straight bit and an ogee bit. Ill add more bits later.
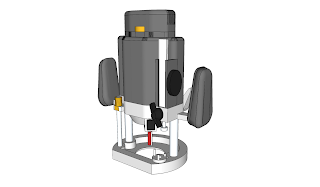
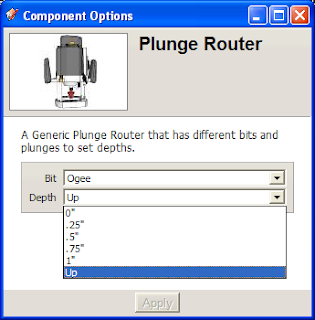
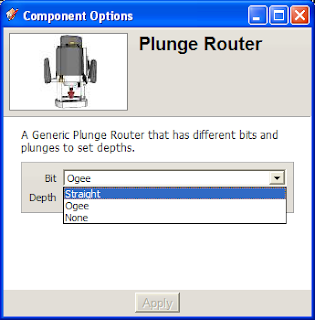
I plan on eventually making the depth of cut so you can enter it rather than picking from a list.
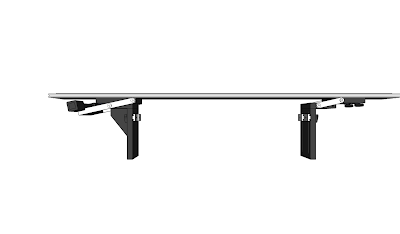
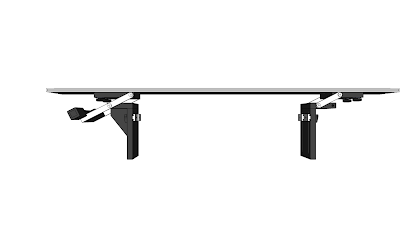
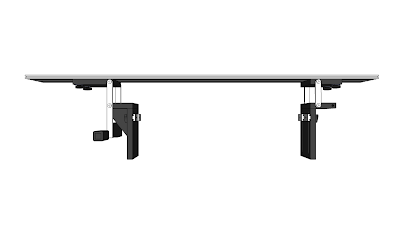
Among the EZ components, is the B-300 bridge that allows you to enter the width of the table it is mounted to, and you can select from full up, full down and 3/4" positions for the bridge. Im working on allowing you to enter the required height, but not there yet.
Read More..
I have modified all the extrusion components to act this way. In addition, I have added a choice to either have the component without color, or with my color scheme applied. I have added this feature to almost all of the components and will eventually have them all that way. To add this feature to the more complex models requires considerable boring work, so they will only get that feature later. These components have the color scheme active.
It is these more complex components that I am having the most fun with. For instance, the Circular Saw with EZ Smart Base component has a number of options that can be set. You can enter the depth of cut in the Options Window and apply it and the saw changes to the desired depth of cut, but an additional 1/8" is added to the depth, to clear the bottom of the work piece, just like I do in the real world.
You can select none, AC-1, or AC-2 for the anti-chip insert, but if you change the angle of cut from 0 degrees with the AC-2 selected, the component automatically switches to the AC-1 until the angle of cut is returned to 0 degrees. The angle of cut can be from 0 to 45 degrees.
In the tool line, I have also uploaded a router that you canselect the depth of cut and select which bit to use. Currently there are only a straight bit and an ogee bit. Ill add more bits later.
I plan on eventually making the depth of cut so you can enter it rather than picking from a list.
Among the EZ components, is the B-300 bridge that allows you to enter the width of the table it is mounted to, and you can select from full up, full down and 3/4" positions for the bridge. Im working on allowing you to enter the required height, but not there yet.
Weekend in Review What Im Working on

This weekend we took a trip down the coast to visit Santa Barbara, the outlets and a few antique shops north of LA.
I found these great knobs at Anthro in the clearance section. Im hoping to use a set on a printer/paper storage cabinet that we are working on.
We visited Avila Valley Barn where I found these beauties, apparently everyone in slo county had the same idea ... it was packed! Im finally working on some fall decor!
and we started designing a new stencil, still a ways to go, but it is beginning to take shape!
Im off to work on my fall wreath/porch, photos soon!
Subscribe to:
Posts (Atom)